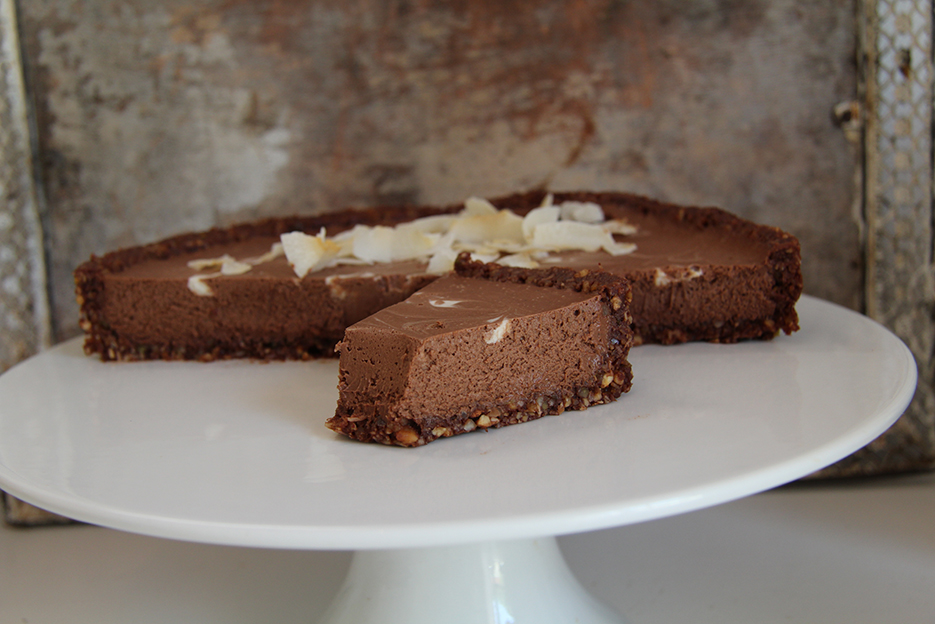
k Raw vegan chocolate coconut mousse cake k
I cannot begin to tell you how ridiculously delicious this recipe is, if you love chocolate and coconut then this is seriously for you. It’s decadent, rich and exquisite…and even a small slice will deliver a dreamy chocolate hit beyond belief. I have recently been playing around with raw and vegan desserts after conquering an incredible raw carrot cake recipe and being astonished by how amazing it tasted. Since then you could say I have been quite hooked on making healthy versions of what would ordinarily be considered naughty .
This recipe has proven to me (and my family) that you can make an unbelievably silky chocolate mousse with a wonderful crunchy base with incredible flavours of chocolate and coconut but without refined sugar, wheat, diary or eggs!
You do need to be prepared in advance because you have to refrigerate the cans of coconut milk overnight so that the cream will solidify and separate. Try and buy medjool dates as they have an incredible rich, almost caramel like taste – if you can’t get these you can use regular dates but they will need pre soaking in warm water to soften up. Also look out for a very good quality dark chocolate with a high percentage of cocoa.
With the cost of the ingredients it makes for a very extravagant dessert to compliment any dinner party or special occasion – or even for self love…you can keep it in the freezer and take regular spoonfuls and be transported to healthy food heaven.
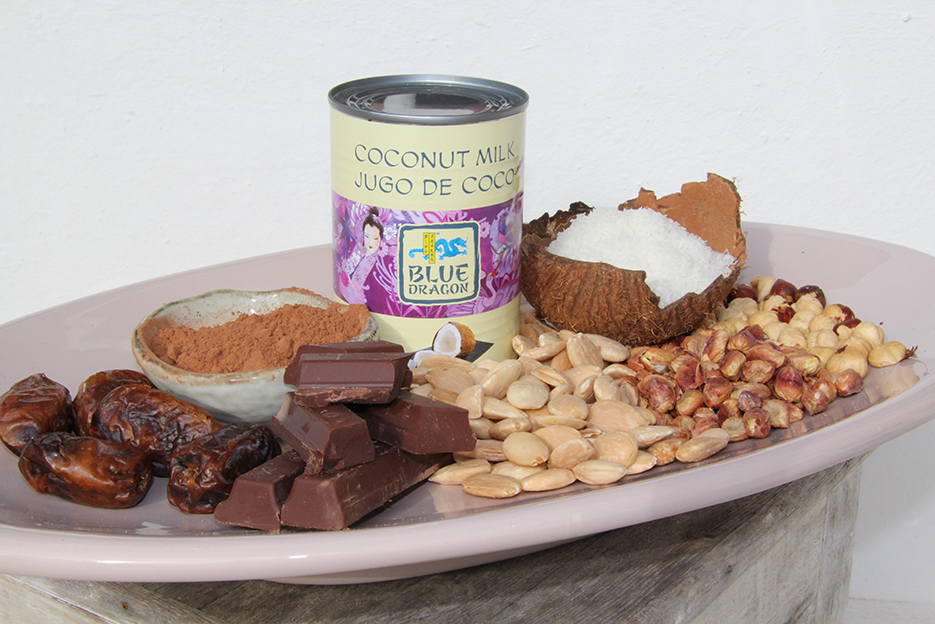
Ingredients
(serves 10-12)
For the crust:
100g blanched almonds
100g hazelnuts
50g unsalted pistachio nut
40g desiccated coconut
100g medjool dates, (pre soak if using regular dates)
20g raw cacao powder (or good quality sugar free coco powder)
1 tablespoon date syrup
1 pinch sea salt
For the chocolate coconut mousse:
200g dark chocolate (70/80% minimum)
2 x 400ml can full fat coconut milk (keep in fridge over night)
2 tablespoons date syrup
2 teaspoons vanilla bean paste (or good quality vanilla extract)
Method
- You need to put the coconut cans into the fridge at least 24 hours before making this recipe.
- Grease a non-stick spring-form tin with a little coconut oil (or line with parchment paper).
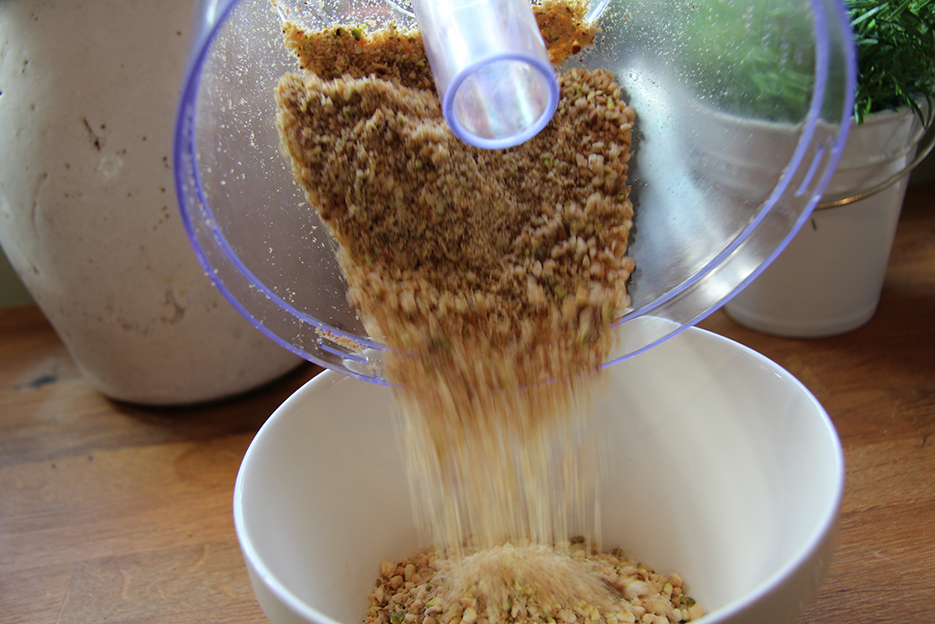
- Put the almonds, pistachios, hazelnuts and desiccated coconut into a food processor and pulse until chunky sandy consistency, then pour into a bowl.
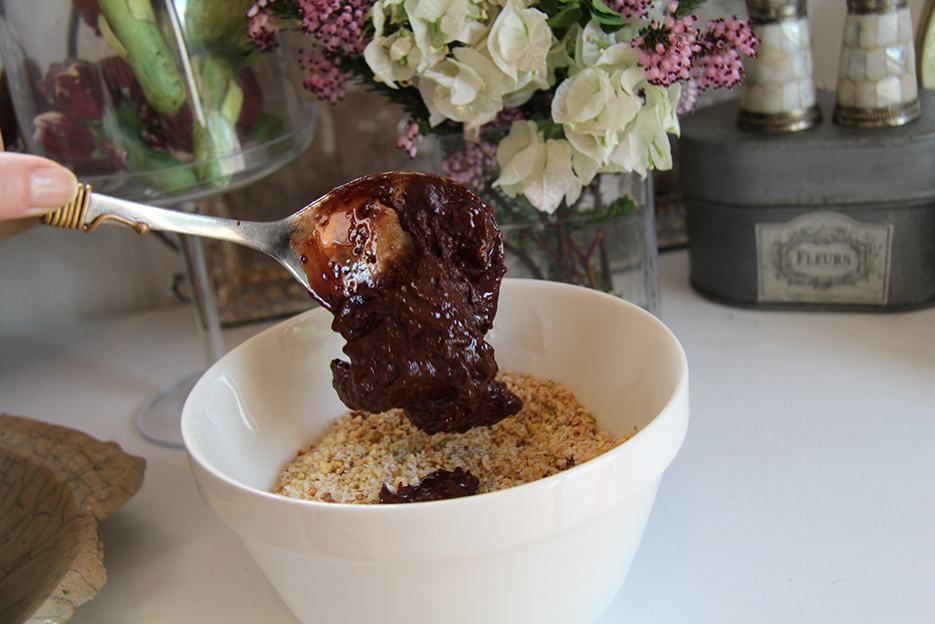
- Now add the dates, syrup, cacao powder and salt to the food processor, blend until smooth.
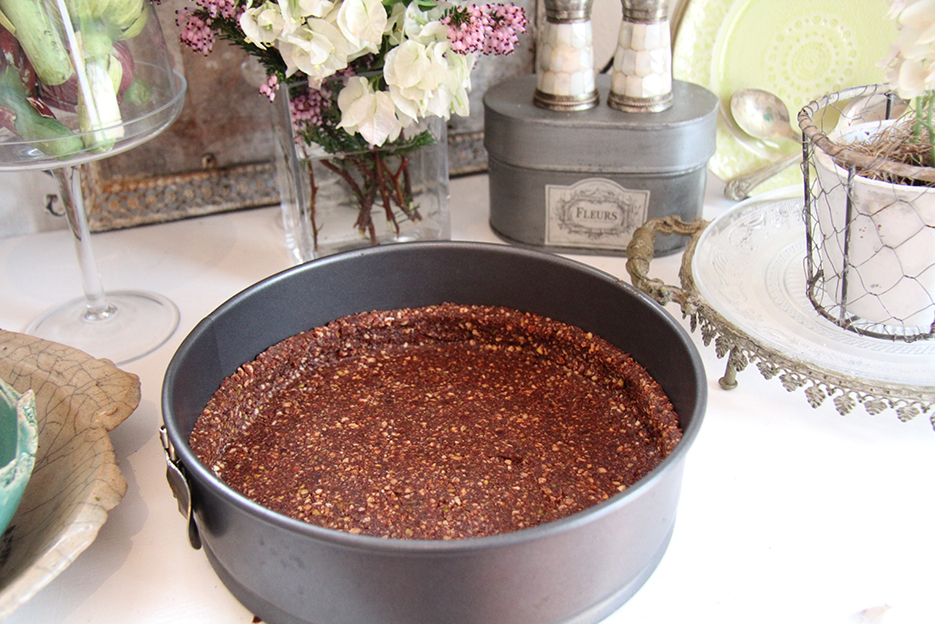
- Add the nut mixture into the blended dates and mix until completely combined. Place into your prepared tin, press down the mixture firmly on the base and one inch around the sides (use a spoon and your fingers to really work the mixture into shape) and place in the freezer.
- Remove the coconut milk cans from the fridge, turn the can upside down and open the opposite side. Gently pour the liquid milk to separate from the hard cream at the bottom (you only want to use the thick part of the coconut, discard the milk, or drink, or use in another recipe like a Thai curry).
- Put the coconut cream into a food mixer or use an electric handheld whisk. Beat for about 5 minutes, stopping occasionally to wipe down the side of the bowl. You will see it becomes the consistency of whipped cream.
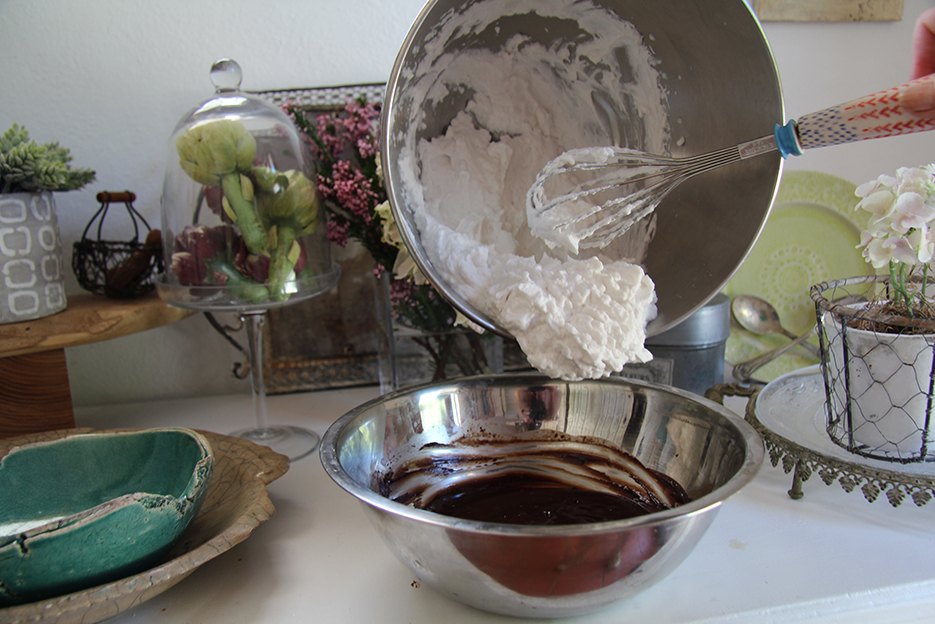
- Now melt the chocolate in a metal/or glass bowl over a pan of simmering water. Stir it time from to time until nice and melted. Add the date syrup and vanilla paste, then leave to cool before adding the cream.
- Reserve about 2 teaspoons of the whipped cream (for decoration) then slowly fold the cream into the chocolate mixture, mix well until evenly blended. You might need to use the electric whisk to ensure it is completely combined.
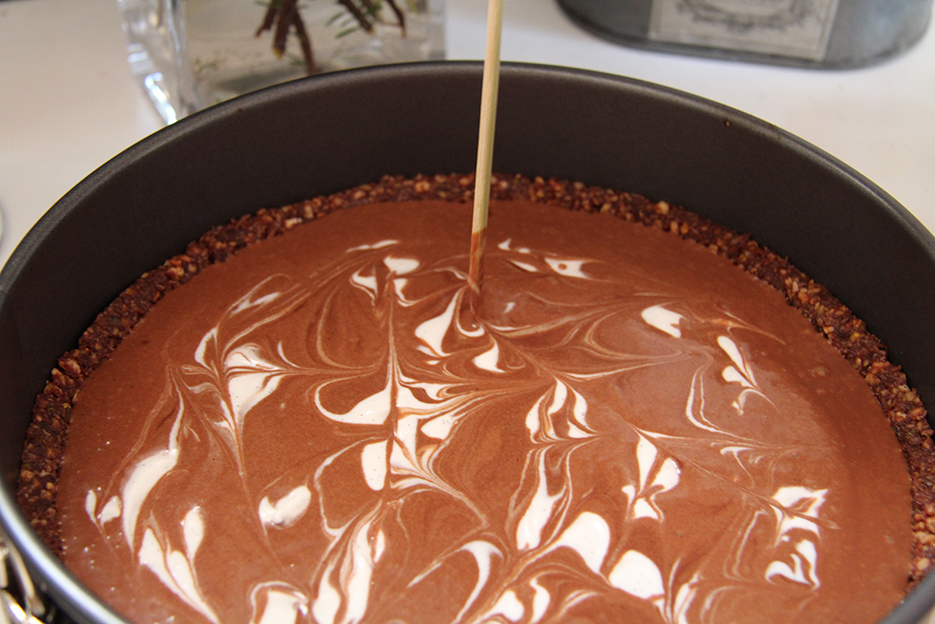
- Remove the nut base from the freezer and pour the chocolate mixture and smooth out until you have an even surface.
- Now carefully spoon the reserved whipped coconut cream over the top of the mousse and then using a skewer or fork to mix up to create a pretty marble effect.
- Refrigerate until set (about 3-4 hours) you can speed this up by freezing. Served super chilled and be prepared to seriously enjoy!
Twitter @JohnTorode1 Please come to Ibiza! Big wonderful food scene here that you would #love!
- #SpecialReport on gut health & #kombucha and #fermentedfoods on https://t.co/4hJixZoAZi https://t.co/G1jEOnzj4R
Follow @lovefoodibiza_
Latest Posts
Beats & Eats with Natascha Polké
Natascha Polké ‘Into You’ EP drops April 55th on [PIAS] Électronique A track you love to hear on a sunny morning… YaYaYa by RY X Your perfect breakfast would be… In the sunshine starting with a cappuccino. Personally, I have a weakness for scrambled eggs, especially when they’re paired with spinach and some ricotta […]Read More
Lukasz 50th Birthday Celebration
Saturday Birthday Buffet Feast Cava poached whole sides of salmon with mint labneh, pomegranates, Za’atar marinated Lebanese chicken Classic cucumber mint dill tzatziki Spicy ginger garlic prawns with rice noodle salad, roast asparagus red peppers Lamb (or beef) köftes with a spiced turmeric yogurt Buckwheat tabbouleh with roasted hazelnuts Lightly curried orzo with corn, mango […]Read More
Beats & Eats with Axel Haube
Axel Haube is an evocative DJ who plays with great control. Hailing from Belgium, he hints at where he’s going before pulling back, building tension, and dropping the right record at the right time to send crowds into overdrive. His storytelling sets of melodic and cosmic techno are powered by dark but driving grooves and […]Read MoreCelebration Summer Lunch
Suggested Pre Lunch Mezze/Nibbles Cooling cucumber tarragon mint soup shots Butterbean humus with muhammara, crispy sage and dukkah Garden vegetable crudities Marinated olives and feta Kettle-style crisps and nut bowls The Main Buffet Lunch Homemade focaccia: Cherry tomato rosemary Giant rainbow chakra bowls with a warm nut butter satay pouring sauce Local Ibiza mixed leaf […]Read More
Beats & Eats with Alisha
ALISHA makes an impressive debut outing on Hot Creations with ‘Changes’, backed by a remix from Chicago house legend Mike Dunn. A bubbling name within the UK house landscape for several years, it’s fair to say that 2022 was the year that ALISHA truly emerged as a surging name of note, dropping stand-out material via […]Read More
Beats & Eats with Natascha Polké
Natascha Polké ‘Into You’ EP drops April 55th on [PIAS] Électronique A track you love to hear on a sunny morning… YaYaYa by RY X Your perfect breakfast would be… In the sunshine starting with a cappuccino. Personally, I have a weakness for scrambled eggs, especially when they’re paired with spinach and some ricotta […]Read MoreLukasz 50th Birthday Celebration
Saturday Birthday Buffet Feast Cava poached whole sides of salmon with mint labneh, pomegranates, Za’atar marinated Lebanese chicken Classic cucumber mint dill tzatziki Spicy ginger garlic prawns with rice noodle salad, roast asparagus red peppers Lamb (or beef) köftes with a spiced turmeric yogurt Buckwheat tabbouleh with roasted hazelnuts Lightly curried orzo with corn, mango […]Read MoreBeats & Eats with Axel Haube
Axel Haube is an evocative DJ who plays with great control. Hailing from Belgium, he hints at where he’s going before pulling back, building tension, and dropping the right record at the right time to send crowds into overdrive. His storytelling sets of melodic and cosmic techno are powered by dark but driving grooves and […]Read MoreCelebration Summer Lunch
Suggested Pre Lunch Mezze/Nibbles Cooling cucumber tarragon mint soup shots Butterbean humus with muhammara, crispy sage and dukkah Garden vegetable crudities Marinated olives and feta Kettle-style crisps and nut bowls The Main Buffet Lunch Homemade focaccia: Cherry tomato rosemary Giant rainbow chakra bowls with a warm nut butter satay pouring sauce Local Ibiza mixed leaf […]Read MoreBeats & Eats with Alisha
ALISHA makes an impressive debut outing on Hot Creations with ‘Changes’, backed by a remix from Chicago house legend Mike Dunn. A bubbling name within the UK house landscape for several years, it’s fair to say that 2022 was the year that ALISHA truly emerged as a surging name of note, dropping stand-out material via […]Read More